In the App Store there is a good range of magnifiers, text-to-speech and other apps to support learners with additional needs. But before you buy any of these apps take a minute to look in the ‘Settings’, (in particular ‘Accessibility’) of your iPad.
Apple includes assistive technology in its products as standard features and it is worth spending some time to explore the built-in accessibility features to give you a starting point so your learners are able to maximise the potential that the iPad offers to help access the curriculum.
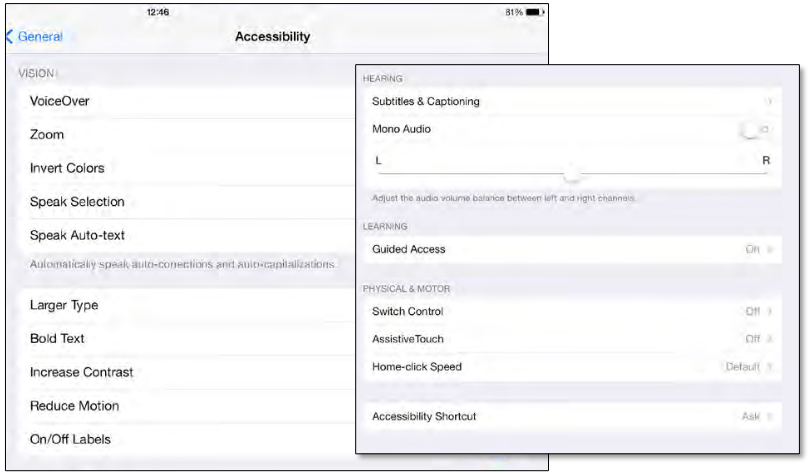
Accessibility is divided into 4 main categories: Vision, Hearing, Learning and Physical & Motor with each having a sub section of tools.
Vision includes VoiceOver, Zoom, Invert Colors, Speak Selection, Speak Auto-text, Larger Text, Bold Text, Button Shapes, Increased Contrast, Reduced Motion, On-Off Labels.
Getting started
1. The first step is to tap the Settings button. This opens all the options within Settings.
2. When the Settings Panel opens, select General. 
3. Scroll down the page until you come to Accessibility.
Accessibility
All the main Accessibility options are located here. However, it should also be noted that there are also some useful ‘accessibility’ features that are not immediately obvious, such as abbreviation expansion, Siri and Dictation.
 VoiceOver
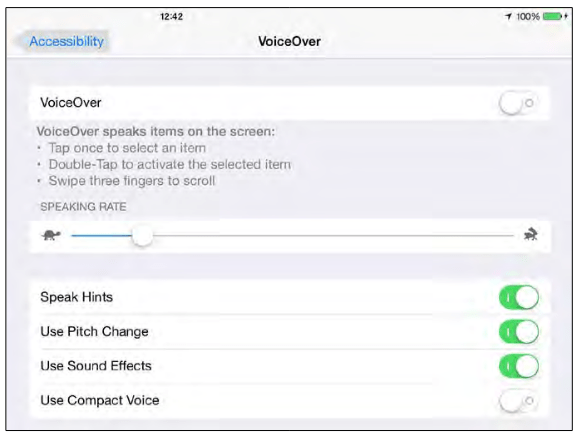
VoiceOver is the iPad’s version of a screen reader, i.e. a feature that will read aloud content on the screen, particularly when an item such as a button or text is tapped or touched. VoiceOver works with those Apps that are pre-installed on a new iPad.
VoiceOver speaks items on the screen. The speaking rate, pitch and voice can be adjusted to suit different needs. 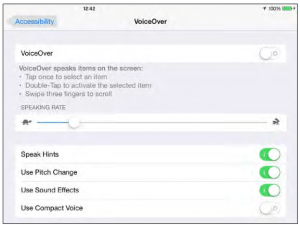
VoiceOver includes a range options including the speed of the Speaking Rate – from very slow to very fast which might suit experienced screen reader users.
Other options such as Use Pitch Change and Use Sound Effect and Typing Feedback are also available i.e. option to speak individual characters or words when typing with the on-screen keyboard or when using an external keyboard.
You can also change the voice option from British English to other English voices such as U.S. English, Irish English etc.
To change a voice in VoiceOver tap Settings
> Accessibility > VoiceOver > Language & Dialects, and finally select Default Dialect, to bring up the options.
A different voice can be also be selected for the Rotor – which provides additional functionality to VoiceOver allowing you to use ‘pinchingmovements’ to do things like browse a web page (find out how many headings, graphics are on the page) more quickly, or navigate a document to check spelling and grammar. A full list of Rotor options is available from the Rotor item in VoiceOver
Using VoiceOver
There are some useful but simple gestures that allow a blind or visually impaired user to interact with items on the screen such as tapping, double tapping, three-finger swipe, which will initially require some practice and familiarisation.
1. To start VoiceOver tap Settings > General > Accessibility and VoiceOver.
Tap the VoiceOver button to turn it on. VoiceOver will start reading information aloud whenever and wherever you touch or select an item. Double tapping with 3 fingers will switch speech on and off but it will not close VoiceOver. Take care – if you triple tap you will black out the screen (i.e. turn on the Screen Curtain)! To see the screen again triple-tap to turn Screen Curtain off. More information about this in point 3.
2. VoiceOver works more efficiently when you use Gestures. For example, Double tap to activate an item, such as turning VoiceOver On and Off. To navigate back to the Accessibility options, double tap the Accessibility button at the top of page and so on.
To scroll through items or pages, ‘Flick’ the screen with three fingers. Another way to navigate around the screen is to hold your finger down and glide it along the screen. VoiceOver will read each item aloud – double tap the item to open it.
3. When VoiceOver is activated a new button appears on the screen called ‘VoiceOver Practice’. VoiceOver Practice is designed to be a ‘safe’ area where you can practice taps, double tapping, flicks etc. VoiceOver Practice is supported with speech guidance which speaks relevant commands. It is recommended that you use VoiceOver Practice to familiarise yourself with the different commands and gestures.
Screen Curtain – triple tapping anywhere on the screen will activate Screen Curtain. This will black-out the screen, simulating what it would be like for a blind user. To switch off Screen Curtain, triple tap the screen with three fingers.
4. Speaking Rate is a simple sliding bar to increase or decrease the rate of the speech.
5. There are some options in this section that allow you to finely tune VoiceOver.
For example ‘Typing Feedback’ provides options for software keyboards and hardware keyboards (Bluetooth attachment). You can choose to set VoiceOver to speak characters, words, and a combination of both characters and words. Pitch Change will change the pitch of the voice, e.g. when pronouncing capital letters etc.
To turn VoiceOver off navigate to Settings and Accessibility or if you have the Accessibility shortcut set up, triple-click the Home button.
Using the iPad with a Braille display 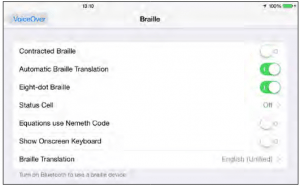
The iPad supports over 40 Bluetooth wireless Braille displays without any additional software.
In order to connect a Bluetooth Braille display to an iPad you first of all need to ‘pair’ the iPad with an appropriate Bluetooth Braille display.
To switch on Bluetooth on your iPad go to Settings > General and Bluetooth.
Long usage of Bluetooth can impact on the length of your iPad’s battery life. For a complete list of iPad compatible Braille displays visit the following link: bit.ly/iPad_Braille_Displays
Zoom
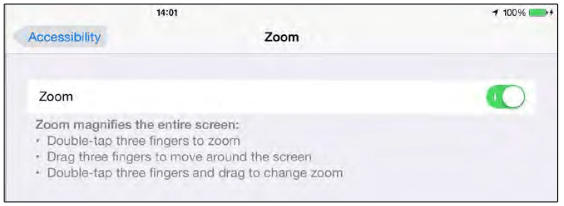
Zoom magnifies items on the screen. Buttons, icons and other items can be magnified up to 500% the original size.
To start Zoom tap Settings > General > Accessibility and Zoom. When you tap the Zoom button you will notice it magnifies very slightly to indicate Zoom is active.
Like VoiceOver, Zoom also requires basic gestures to use it properly:
- Double tap three fingers to magnify.
- Drag three fingers to magnify or zoom.
- Double tap three fingers – hold and drag to zoom in or out – this takes practice but worth the time as it gives you greater control over the magnification levels.
 Zoom can increase icons, icon text, App content and other items on the screen making it easier to see and read. Improvements in screen resolution with Retina display ensures that pixilation is kept to a minimum. Zoom and VoiceOver can be used in tandem providing simultaneous speech output and magnification.
To turn Zoom off navigate to Settings and Accessibility or if you have the Accessibility shortcut set up, triple-click the Home button.
Smart Zoom is not labelled as an Accessibility feature but it is a useful and quick way to make content on the screen larger. Wherever you want the content to appear bigger, double tap on the display with one finger. The content automatically and incrementally appears bigger and ‘zooms’ so it fits evenly on the screen.
Double tapping with two fingers decreases the magnification incrementally. An advantage of Smart Zoom is that you do not have to adjust the screen or move the content around on the screen. Smart Zoom only works in certain Apps such Mail, Photos, Safari, Apple Maps and Google Maps.
Invert Colors
When ‘Invert Colors’ is activated it will invert screen colour and text. The background becomes predominantly black, text is shown in white. Highlighting and activated buttons are shown with an orange tinge.
To start Invert Colors tap Settings > General > Accessibility and Invert Colors.
When you tap the Invert Color button the screen colours are inverted. You can use Invert Colors along with VoiceOver and Zoom.
To turn Invert Colors off navigate to Settings > Accessibility or if you have the Accessibility shortcut set up, triple-click the Home button.
Speak Selection and Speak Auto-text (including Highlight Words)
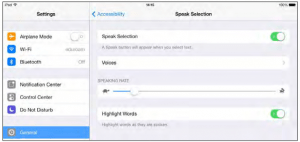
Although ‘Speak Selection’ and ‘Speak Auto-text’ are in the Vision category of Accessibility, they both potentially have benefits to support learners with literacy difficulties, particularly dyslexia. Speak Selection reads selected text aloud. You can define how much text you want Speak Selection to read by selecting and defining the text – tapping and holding/dragging the selection handles.
To activate Speak Selection and ‘Highlight Word’ move the slider button to ‘On’.
You can choose to have Speak Selection and/or Highlight Words or both.
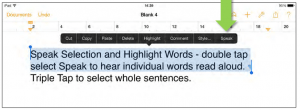
Speak Selection and Highlight Words work in a range of Apps, such as Pages, Safari, Notes and other text based Apps including iBooks and some other book reading Apps.
Speak Selection can be used to read individual words aloud to help with spelling or used to proof read larger documents. To highlight a word, double tap the word (or tap and hold) until the pop up menu appears. You can highlight individual sentences or paragraphs by double-tapping the text with two fingers in quick succession. You can then press the Speak option to have the sentence read back.
You can change the default voice although the voices are limited to English US, English Australia, English United Kingdom, English Ireland and English South Africa.
- Go to Settings > General > Accessibility.
- Tap Speak Selection and Voices.
- Tap the English option (top of the list) and then choose from the list of English options.
Speak Auto-text (including spelling support)
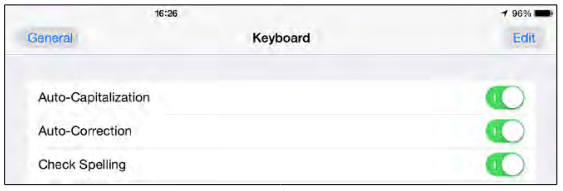
Speak Auto-text speaks suggested corrections which are generated from the Auto-Correction option, found in Settings and Keyboard (the Check Spelling option is also located here). Auto Correction is designed to correct spelling mistakes when completing writing tasks by guessing the word it thinks you want to write. (Auto-Correct is not always accurate and can guess the wrong word.)
If ‘Speak Auto-text’ is active it will read the word aloud thereby providing audio feedback alerting the user of a potential mistake – always be cautious when using Auto-text as it could be more confusing than helpful. Using Auto-text in tandem with Auto-Correct could help some pupils to type more quickly and accurately as ‘suggested’ words are spoken aloud when typed.
Auto-Correction and Check Spelling
An additional option is to use Auto Correction and Check Spelling so spelling mistakes are underlined in red. Although this feature is not in itself an ‘Accessibility’ option it can put to good use. Auto Correction and Check Spelling can be found in the Keyboard section:
- Tap the Settings icon, select General, Keyboard and slide the Auto-correct button to ‘On’.
- Repeat the same steps for Auto-Correction and Check Spelling.
 Whenever a spelling mistake is made Check Spelling identifies spelling errors by placing a red ‘squiggly’ line underneath the spelling mistake. To find an alternative spelling(s) tap the underlined word and suggested words will appear. Pressing the backspace key will also prompt alternative spellings to appear.
Larger Text
Larger Text offers significant visual enhancements for someone with visual difficulties. The size of text can be increased up to 56pt. Larger Text only works in Apps that support ‘Dynamic Type’ i.e. Calendar, Mail, Messages and Notes. It is not possible to increase the size of the font on the keyboard but it is possible to use Larger Text in conjunction with other Accessibility features such as Zoom and Invert Colors.
To activate Larger Text tap Settings > General > Accessibility and Larger Text. Use the slider button to adjust your preferred size of text. Larger Text can also be accessed from General Settings, i.e. Text Size.
Bold Text, Button Shapes, Increased Contrast, Reduce Motion and On/Off Labels
Along with Larger Text, Bold Text, Button Shapes, Increased Contrast, Reduce Motion and On/Off Labels combine to make up the last section of Vision and are intended to make items on the screen such as text and shapes easier to identify and see.
Bold Text emboldens or thickens text descriptions under App icons and other text areas on the screen particularly the on-screen keyboard.
Button Shapes is intended to make buttons easier to distinguish from other text on
the screen (such as icon labels).
Increase Contrast makes it easier for low-vision users to fine tune display settings by improving the contrast on some backgrounds to increase legibility. Darken Colors uses slightly darker versions of the colours used in some Apps (for example, the light blue used in Safari and Settings becomes a darker shade of blue) and Reduce White Point makes the general ‘glare’ of the iOS a little duller.
Reduce Motion uses an effect called ‘parallax’ to create the perception of depth on the iPad’s display thereby accentuating the 3D effect/immersion effect of Retina display.
On/Off Labels uses the ‘I’ or ‘O’ sign within a label so you can quickly and easily see if you have enabled a feature.
All the above features can be turned on or off in Settings > General > Accessibility and Vision. Some features, i.e. Bold Text will require a restart.
There are various tools to teach coding to youngsters away from the computer before they get onto screens with PurpleMash’s 2Code or 2Go, J2Code, Scratch etc; and doing practical activities is an essential aspect of multi sensory learning.
 Beebots aren’t just for the nursery classes. KS1 children can use them to begin learning how to make algorithms instead of giving one instruction at a time. They can learn directional language and how to identify themselves with the beebot so that they can “project themselves” onto a pathway to aid with giving instructions.
Playing a game like “Back to Back, Ear to Ear” will help them to learn the importance of giving a clear instructions.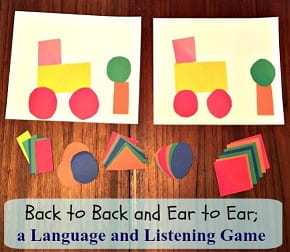

 Coding with Cubetto happens with hands-on coding blocks, which means children can use it irrespective of reading ability or language barriers. This introduces programming concepts like algorithm, the queue, recursions, debugging.
Things to learn after ALGORITHM, are EVENTS and ITERATION.
Here is a nice lesson (away from the computers) that will teach both.
As we start to write longer and more interesting programs, our code often contains a lot of repetition.
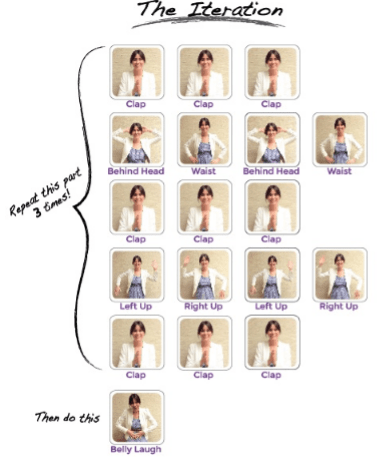
In this lesson, students will learn about how events cause something to happen and (repeats) loops can be used to more easily communicate instructions that have a lot of repetition by looking at the repeated patterns of movement in a dance.
At this point in the course, students should have developed comfort with programming a set of linear instructions.
Frequently the linear set of instructions includes patterns that are repeated multiple times and as students want to write more complex and interesting programs, manually duplicating that code becomes cumbersome and inefficient. To enable students to write more powerful programs, we’ll need to rely on structures that break out of the that single linear list. Loops allow for students to structure their code in a way that repeats. In this lesson, we will focus on identifying patterns in physical movement before moving back onto the computer to look for patterns in our code.
This Dance Party lesson is done away from the computer again. We are all dancing the same dance, we’ll need to know what all of the steps in the dance are, and how many times we should do them.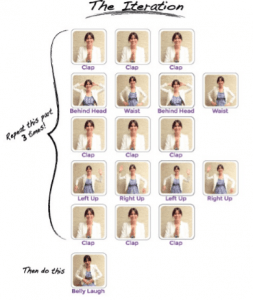
Show Dance actions (on the wall) so that all students can see it. Talk through the different sections of the dance as a class. Demo each action and practice putting them together. (Play Music)
Point out the section that repeats and discuss a quicker way of writing it.
Dance Party Unplugged
One of the challenges in many classrooms, particularly in older schools, is their acoustics. Every teacher has found themselves raising their voice, even to the point of straining it, to be heard above the general chatter and hubbub of the room, even when everyone is on task.
This may be because it is a big, airy, spacious room, with parquet floors and big windows, perhaps from Victorian or Edwardian times, or even from the post-war period, with concrete walls and linoleum on the floors. They are not, generally spaces, where the focus has been on acoustic properties and the ability of the teacher to be heard without raising their voice.
The result is that teachers struggle to be heard, and pupils find it hard to make out what they are saying, even more so if they have a hearing impairment. A Soundfield might the answer.
What is it?
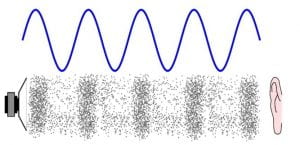
 Essentially it is a classroom amplification system. The teacher wears a discrete microphone and anywhere between one and six speakers ensures that their voice is subtly enhanced. Louder, yes, but also clearer. So everyone in the room distinctly hears what is being said. Handheld microphones can also be used, perhaps for pupil contributions and questions. And, with enough speakers, any space can be catered for, regardless of size, or additional distractions, such as extractor fans in design technology or science labs.
Who is it for?
Whilst pupils with hearing impairments will undoubtedly benefit from having a better quality version of what the teacher is saying – there are also add-ins that can connect directly to hearing aids – anyone in the room can find it helpful. It means not having to strain to hear clearly, which makes it easier to focus on what is needed to be heard, without extraneous sounds, and getting information clearly and accurately the first time – meaning less need to ask peers or staff what was said, or what needs to be done.
How do I use it?
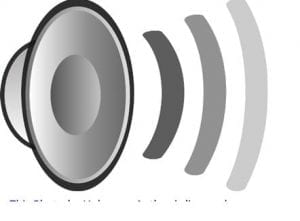 At the most basic level you plug a speaker into a socket and put a microphone on, then adjust the volume to a comfortable level. For more complex installations speakers are hung on the walls at optimum intervals and peripherals added.
When learners hear clearly they understand better, and respond more quickly and accurately. Hence, outcomes improve.
What else is there?
It is possible to get classroom amplification very cheaply. Even an 8watt speaker hung on your belt, such as a tour guide might use on a walking tour of London, can make a significant difference, and can be had for as little as twenty pounds from Amazon.
You could also use a commercial amplification system. The difference with a Soundfield is in working to ensure even sound across the space, at volume levels that are not particularly loud.
There are a few companies providing Soundfield systems. For more information try these
https://www.pcwerth.co.uk/store/soundfield-and-pa-systems
https://www.connevans.info/page/soundfield
Flexibility is key for many learners with special educational needs and disabilities (SEND) when it comes to accessing technology. There can be many factors, some of them variable, that present barriers to using it, but providing solutions that are themselves not fixed can mean that more opportunities are created.
I recently met two young men with powered wheelchairs who were very adept at moving around their secondary school, but who found it difficult to sit at a standard desk. In most classrooms they used there were height adjustable tables, as well as a number of computers. However, the two didn’t coincide. The computers were on benches at the back, the tables in the middle of the room. So their ICT access was limited either because the available PC was not on a height adjustable desk, or there was no laptop in the room to use instead.
Simple answer, put the PC on the height adjustable desk. Or, buy a laptop.
Even these had snags. To put a PC on a height adjustable desk would mean taking out some benching and losing space for probably two other machines. Whereas a laptop would mean being very close to the table because of the position of the keyboard relative to the seating position of the student.
A third one is to provide trays for the wheelchairs. Sounds easy but the sleek design meant there are few obvious fixing points.
The issue, then is one of positioning. How can the technology be placed so that the students can use it, regardless of whether they have a table, a tray, or a bench? Flexibility is the key.
Many laptops now have screens that will flip over, or twist, so the keyboard is ‘put away’ and what is left is a monitor. Several of these are also touch enabled, making them tablets. The Lenovo Yoga is a good example of this.
Combined with a wireless, compact, keyboard (standard size keys, but not numeric pad) and a wireless mouse several options become available. Use it as a standard laptop. O tablet. Or a PC with separate mouse and keyboard. Position it on a tray. On a height adjustable table. Or even, at a push, on a bench with the keyboard on a lap.
With weight constantly dropping and battery life rising (the Yoga is 1.6Kg with 8 hours battery life) the flexibility this arrangement presents is extended to working just about anywhere, in school or out, indoors or out. Providing options and choices that are always available, where once there were only limitations.