Inclusive teaching with PowerPoint

Much maligned  – who hasn’t suffered ‘death by PowerPoint? – but a classroom perennial, PowerPoint can be a really useful tool, but, like with all tools, it works better in the hands of a trained user. It can be a really useful tool for inclusion.

Teachers use it extensively: at  registration, for instruction, to structure lessons and help keep the pace, to introduce  each new topic, as a prelude for a visit, to give out notices, and to create personalised resources. You might also use them as a framework for activities, scrolling through automatically on the interactive whiteboard to give the class an immediate reminder, a prompt, of what they have been asked to do.

So the  first thing to be sure of is that what you are creating is accessible. Here there are three main considerations: can all pupils see it; can they understand it; is it ‘Goldilocks Compliant’ – content that is not too little, nor too much, but just right.

There are a number of things you can do to help meet those criteria;

For instance;

  • Make it plain. Don’t bother with ‘designer’ colour schemes and lots of bells and whistles.
  • Use a high contrast design, maybe with a ‘cold’ colour for a background, and a ‘warm’ colour for the font. Yellow text on a dark blue slide, for instance.
  • Keep the background plain, without effects or logos or other clutter.
  • Use a Sans Serif font, such as Arial or Comic Sans, that is at least 30 point so it can be read from the back of the class.
  • Put the text towards the top of the slide so it can be read over other pupils’ heads.
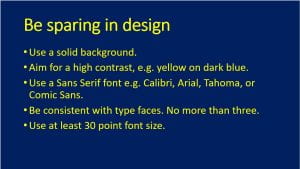
  • Use no more than six bullet points on a slide, with no more than six words in each.
  • Write in note form, you don’t need to use full sentences to get content across.
  • Use images and graphics to connect the learning, particularly symbols.
  • Be wary of using gifs and animations that might distract attention. And don’t use transitions or animated text either.
  • The presentation provides the framework to scaffold the learning on, you, the teacher, – along with the other resources you use – provide the substance.

Put simply – keep it simple. Remember, the focus of teaching and learning in the room should be the teacher, not what’s on the board, however, it may be your principle means of instruction, so you need to get the most out of it.


Soundfields – improving focus and outcomes

One of the challenges  in many classrooms, particularly in older schools, is their acoustics. Every teacher has found themselves raising their voice, even to the point of straining it, to be heard above the general chatter and hubbub of the room, even when everyone is on task.

This may be because it is a big, airy, spacious room, with parquet floors and big windows, perhaps from Victorian or Edwardian times, or even from the post-war period, with concrete walls and linoleum on the floors. They are not, generally spaces, where the focus has been on  acoustic properties and the ability of the teacher to be heard without raising their voice.

The result is that teachers struggle to be heard, and pupils find it hard to make out what they are saying, even more so if they have a hearing impairment. A Soundfield might the answer.

What is it?

Essentially it is a classroom amplification system. The teacher wears a discrete microphone and anywhere  between one and six speakers ensures that their voice is subtly enhanced. Louder, yes, but also clearer. So everyone in the room distinctly hears what is being said. Handheld microphones can also be used, perhaps for pupil contributions and questions. And, with enough speakers, any space can be catered for, regardless of size, or additional distractions, such as extractor fans in design technology or science labs.

Who is it for?

Whilst pupils with hearing impairments will undoubtedly benefit from having a better quality version of what the teacher is saying – there are also add-ins that can connect directly to hearing aids – anyone in the room can find it helpful. It means not having to strain to hear clearly, which makes it easier to focus on what is needed to be heard, without extraneous sounds, and getting information clearly and accurately the first time – meaning less need to ask peers or staff what was said, or what needs to be done.

How do I use it?

At the most basic level you plug a speaker into a socket and put a microphone on, then adjust the volume to a comfortable level. For more complex installations speakers are hung on the walls at optimum intervals and peripherals added.

When learners hear clearly they understand better, and respond more quickly and accurately. Hence, outcomes improve.

What else is there?

It is possible to get classroom amplification very cheaply. Even an 8watt speaker hung on your belt, such as a tour guide might use on a walking tour of London, can make a significant difference, and can be had for as little as twenty pounds from Amazon.

You could also use a commercial amplification system. The difference with a Soundfield is in working to ensure even sound across the space, at volume levels that are not particularly loud.

There are a few companies providing Soundfield systems. For more information try these

https://www.pcwerth.co.uk/store/soundfield-and-pa-systems

https://www.connevans.info/page/soundfield


Using Chromebooks for SEND.

Working in Tower Hamlets over the years, amongst other things, we have recommended software for PCs & laptops, apps for iPads & Android devices and more recently resources available for chrome books.

Chrome books are a budget friendly and portable computing option. They use Google Chrome operating system and are designed to be connected to the Internet. They’re an ideal choice if you use mainly browser-based apps.

Chrome books switch on quickly, automatically update and come in various sizes. Their versatility for SEND relies on useful and engaging web apps. Chromebooks have built-in accessibility options that can be adjusted to suit individual needs and have USB ports that allow a variety of assistive devices to be connected. Overall, the accessibility options are quite good, though there won’t be a solution for everybody. In addition to the built-in features of Chrome OS, the Chromebook can use Apps and Extensions to enhance access. Apps are individual, web-based programs and activities, while Extensions provide enhancements to Chrome OS working across a range of web pages and apps, in the same way that extensions add functionality to some other web browsers. Here is a guide to using Accessibility Options on chromebooks from www.callscotland.org.uk

A lot of software that once had to be loaded onto networks is now available online. You can now  find Word shark online and the much-loved 2Simple software  you can now find on their online primary software suite PurpleMash.

All schools have got different systems for making devices available to children. Many schools no longer have ICT suites but use trolleys of devices that can be wheeled around to different classrooms. For ordinary curriculum purposes this is a great idea but some children (particularly those with SEND) need to have a device available to them for their exclusive use at any time.

Schools have got different systems in place for the devices made available to children with SEND. The system needs to be efficient and needs to consider the geography of the building, the whereabouts of the SEND students and keeping the devices charged and ready for use as needed. If you are using iPads and chromebooks it’s vital that your school has efficient Wi-Fi.

One of the disadvantages of a chrome book is that you cannot load special SEND software like Clicker 7 or Dragon “Naturally Speaking” onto it.  So if you have a particular need, you have to hope that there is a chromebook app or extension  that will provide for that need. As far as “speech to text” software goes (like the Dragon software) the problem is solved by Google incorporating Voice Typing as a tool on Google Docs. As far a Clicker is concerned Cricksoft have created Clicker apps for chrome books.

The Clicker apps for chrome book are the same as those for iPad however the pricing is different being. Clicker Apps for chromebook cost £30 for a years subscription for one app and then various degrees of pricing for site licenses. To find out more look at cricksoft.com/uk/clicker/chromebook

Here is a list of Chromebook apps and extensions that can be used by learners with Dyslexia


Wordshark online – an online update of an SEND perennial

What is it?

It’s hard to remember a time before Wordshark was available. If you don’t know it, it is primarily used for practice and reinforcement of spellings, particularly for those struggling with these skills, such as pupils who are dyslexic. Although it could be used by learners of all ages for the acquisition of key vocabulary.

It comes with a database of 10,000 words, all with pre-recorded speech, which can be sorted to be used in several different ways. One is the National Curriculum wordlists that pupils are expected to know as they progress through primary school. Another is Alpha to Omega, a scheme designed for those with dyslexia, and then there is the popular Letters and Sounds, or the subject specific words aimed at secondary students. You can also add your own lists if there are words you can’t find, perhaps for a particular topic.

The lists themselves are broken down into appropriate groups, such as CVC, or magic-e, and to aid learning further, words can be viewed with their phonetic make up marked, or they can be split into user-defined chunks.

Along with the wordlists are around 40 games. Once the words to be practised have been selected a number of games are recommended to use, which  can be worked through, or you can open a tab for one of the specific groups: Blend, Segment, Read, Spell, and Patterns. You can also choose specific games you want pupils to use, and assign work for them for  when they log on.

As it is web-based learners can access it from anywhere there is an internet connection, allowing for home and parent/carer involvement, too. The words can also be printed out for study away from the screen.

The whole system comes with a placement test, if you are not sure where is the best place for the pupils to get started, and a monitoring and tracking facility to see how they are getting on.

Who is it for?

The original conception was for dyslexic pupils, but it could be used by just about anyone, with primary pupils following the National Curriculum, or Letters and Sounds, lists, and secondary working on the subject specific vocabulary. With the capacity to add lists it could even become a learning resource for A Level students doing Classics who want to learn Latin or Ancient Greek.

The various approaches to spelling taken, include seeing it then typing it, finding the correct outline shape, bringing chunks together, and even speaking it aloud, all come with  a range of activities. This means that drill and practice becomes less of a chore, and even a bit of  fun.

How do I use it?

Mainly for reinforcement. To provide a range of activities presented in an interactive, varied, fun, way, that makes over-learning acceptable, rather than a drudge. Whilst it will largely be used by individuals, there is the potential to use it with a small group around the interactive whiteboard.

What else is there?

There are quite a lot of apps, programs and websites that provide different approaches to spelling. Where Wordshark differs is in the variety of approaches available, along with the flexibility to choose which wordlists to work from, or to create your own. All with the ubiquitous access the internet offers.  Flexibility, reliability, and availability, are the keywords here.

Using iPads to make a podcast using GarageBand

Make sure you have GarageBand on your iPad and it will help if you have a microphone that you can connect instead of using the built-in microphone on the iPad. (Maybe even some earbuds with a microphone that is nearer to your mouth.)

Open GarageBand on the iPad, click on the add song button (or the + sign) and select AUDIO RECORDER >  Voice. On the studio view select Narrator.
Right under the control bar (on the right) hit the + sign (Song Sections) and change it from eight bars to Automatic. Tap off the menu. In the control bar tap the wrench, tap “Metronome and Count-in“. Change it to No sound and tap off the menu. Adjust the input level (on the left side) to show as much green as possible and now you can record.

When you press Record, the ruler becomes red and moves along. Touch the stop button when you’re done recording that track.Tap the tracks view icon on the control bar to listen to your track.  Press play to preview and move the play head around to listen to different parts of your track if you need to.

(To add another track press the + on the bottom left of the screen. If you need to record your voice again choose “narrator” and check that the settings are as they were before.)

When editing you can move the tracks around by touching them and sliding them with one finger and if you want to zoom into the track you put two fingers on the screen and pinch them apart.

To see more options for different parts of the track you can double tap on the track and a menu option comes up which includes Split. If you swipe down somewhere on your timeline it will split the track. The yellow bars on the end of each region allow you to trim the ends of each of the recordings.

You can add music tunes as a background tracks. There are some built-in to GarageBand but it is possible to import your own tunes. Choose another track with the same settings then choose the Loops icon on the control bar and choose Audio Files, and drag in the audio file that you want.

To edit the music, slide the side bar (next to the track) over to the left to show the title of the track, the solo & mute buttons,  the metre and the volume.

Tap the microphone icon  and select Automation. On the top left of the screen slide the pencil over until the button is red. Click on the timeline to create automation points to create slight raises or decreases in the volume. When done slide the pencil to lock the automation points.

Listen to the entire episode to make sure you don’t need to do any more editing and then you can share your track. It will save into the “My Songs” folder. It saves as an .m4a file and so can be loaded onto Podcast Central on the London Grid for Learning.


Go Talk Now (lite) an easy start for AAC

What is it?

One of the simplest electronic communication aids – so-called augmentative and alternative communication (AAC) – is the Go Talk. A physical device with a set number of squares in a grid that when pressed played a recorded message. They come in various sizes, and each can be loaded with a number of set ups which are then associated with an overlay to guide the user.

It is a system that has now been made into an iPad app which has retained much of that simplicity.

To get you started there is a no-cost ‘Lite’ version which is restricted to six pages, but within that these can include an on-screen keyboard, grids to build complete sentences, or single word responses. The grids can range in size from 1 to 36 cells, any and each of which can contain both text and images, or just either, and the option to speak either the words shown, or a recorded sentence, as well as switching to another page.

This flexibility means it can be used by those who can read, and by those who need images or symbols, and everyone in between.

Who is it for?

Anyone who needs a voice. This might be a child or young person with an autistic spectrum condition who is non-verbal, or else someone with a speech and language condition that makes their words indistinct, or even a learner with profound and multiple learning difficulties who is given two options to make a choice for what they want to drink.

It could be used by an individual, or shared and passed around a group, perhaps to build new vocabulary, or to rehearse language for social situations.

How do I use it?

The simplicity and flexibility of the set up mean that it can be used in myriad ways. It could be given to a learner to take everywhere to literally be their voice – whether that is in class, out in the playground, and even when they go home or go to the shops. It might also be a way for a pupil to join in a lesson. Grids with appropriate answers can be prepared so that he or she can answer teachers questions, or make choices about what is happening in the lesson, or maybe to give them options for what they want to do next.

For instance, a grid of numbers will allow them to join in  a mental maths lesson. Initial letters might help with phonics, and adjectives with descriptive writing. It is also a useful assessment tool, both for literacy itself to ascertain reading levels as they read words to complete activities, or to assess understanding of what has been learnt.

What else is there?

There are a number of great  communication apps on the  market, such as Proloquo2go, Grid Player, and Clicker Communicator, all offering similar features. What distinguishes Go Talk Now (Lite) is that it can be downloaded and installed for free, albeit limited to six pages, then quickly edited and expanded. Whilst Grid Player is also free, you need to invest in  Grid 2 to edit and create pages.

Because of its easy availability Go Talk Now is an easy point of entry into AAC.

Independent learning through technology

Aran is ten. He was a normally developing child until the age of six when he had a major medical event which required life saving surgery, but which left him brain damaged. He spent a year in hospital then a year in a rehabilitation centre before going back into a mainstream school at the age of eight.

His life has changed considerably. Previously he was meeting age related expectations, and no concerns were expressed about his learning needs or language development. He is now in a powered wheelchair, with his  only assured movement in his left arm. His speech and language are also seriously affected. It is as if, at his young age, he has had a stroke.

When he first went back to school his communication was single words, and consideration was given to providing an augmentative and alternative communication aid (AAC) such as an iPad loaded with Prologquo2go. This is a simple, on-screen, grid from which the user selects the word or phrase they want to say. Frequently the grid will have symbols in the cells as many users will have literacy difficulties, and this can speed up word finding. Unfortunately he did not have sufficient muscle tone in his arm to be able to lift it far enough to touch all of the screen, nor the ability to isolate a single finger to tap or to swipe. This also meant that using an iPad was out for curriculum work.

We decided to find another way of working, whilst at the same time using the iPad for games and activities that might help build his capacity to use it more effectively in the  future.

We began to introduce a laptop with a switch attached. This is a large button that is pressed to create a response on the screen. At first we tried simple activities where a picture is built with each click of the button, which then became animated after five clicks as a reward. Aran picked this  up very quickly and was soon using  ChoooseIt Maker Readymades for curriculum activities. These are a number of sequential screens, each with a set of cells  – between two and eight – laid out like a grid, containing possible answers to a question (which can be written, read aloud, or both). Each cell is highlighted in turn and when it gets to the answer the user presses the button.

Fairly quickly we were able to add a second switch meaning that  instead of automatic scanning one button moved the highlight on the screen whilst the other was used to select the chosen answer. This set up meant that Aran was able to work independently for the first time since he had returned to a classroom, to the extent that his teaching assistant could leave him to work whilst she nipped to the loo, grabbed a cup of tea, or worked with one of the other  children in the class.

We also invested in ChooseIt Maker3 so that we could create more challenging material for him to use in class.

It is difficult to know how much he is remembering from what he learnt previously, before he became ill, or whether he is learning afresh. Similarly with his language development, some of it may be recovered, some learnt. However, his speed of recovery, whilst slow, is continuing – and gaining – apace.

He is now using two switches with the on-screen keyboard and predictor in Clicker7 to write short pieces of work, as well as using three switches to control his wheelchair. His language is such that he is using sentences of several words, although AAC is sometimes used to help him express his feelings when in counselling sessions (provided to help him make sense of the situation he now finds himself in).

Whilst it is impossible to know where his developmental path will take him, it is clear that without technology he could not operate with any independence in school. It allows him to get himself around, to work and to write, as well as contributing to his growing capacity to communicate.


LGfL’s Space Adventures – designed for everyone?

In 2018  the London Grid for Learning published online a resource for primary schools created around a sci-fi story of a young woman undertaking a journey to the moon for a mining company. Set not far into the future, the story is told in a series of talking head videos as the mission gets underway, as the astronaut, Taz collects rock samples on the moon, and then as it goes alarmingly wrong on her way back to earth. It is an exciting, engaging story, that comes with a wide range of resources to help with differentiation in the classroom and to make it inclusive for all learners.

The videos themselves were shot using a professional actress, so the various emotional states the astronaut goes through are well-portrayed, helping children to understand how she responds at different points in the story, and her associated feelings.  They are kept reasonably short and will work as engaging lesson starters.

Each video is sub-titled so learners with hearing impairments can enjoy the story, but this may also help those who are learning English as an additional language by linking words to text. And it makes it easier to follow a noisy environment.

They also come with transcripts, either to download for further study or re-enactment in the classroom, or  for use with screen readers for visually impaired learners to follow what is going on. Similarly each episode is also written as a chapter of story, so it can be studied as a book. In order to make sure this is accessible to more pupils in the class the story is also available in an ‘easy read’ format, with shorter sentences and a less demanding language level, but still with the core elements of the story present.

Then there are the audiobooks, designed so pupils can follow each chapter as it is read, or listen to it as a standalone story. Useful for visually impaired learners, but also helpful for those who are dyslexic, new to English, or even those who simply like having stories read to them.

Beyond this the resource comes with ready made worksheets, including some that are simplified and created using Widgit symbols that help with decoding the text.

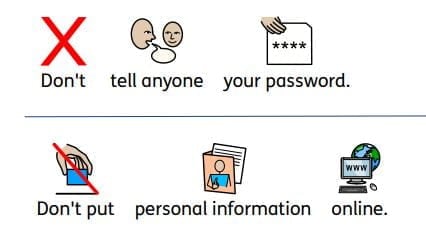
It’s not just  the printed materials that are symbolised, the website itself has the Widgit Point system activated, so any word on the web-page that the viewer hovers the  mouse pointer over will activate a pop-up glossary with the Widgit symbol for that word, to help with decoding. Other accessibility option include a choice of using the Dyslexie font that is said to make reading easier for those with dyslexia, and a switch to a high contrast  colour scheme – helpful for some visually impaired users.

Of course, travelling into space also supports study in subjects other than literacy, so additional materials include lesson plans, starter presentations, and worksheets for Computing, Maths, and Science, too. Whilst these are not differentiated or adapted for SEND, there are some useful activities, particularly in computing. These latter activities are built around the trip to the moon, with learners creating animations in Scratch. To get them started there are explanatory videos, files of code to work from, and assets such as rockets and re-entry capsules so that they can focus on the code rather than creating the  individual elements of the project.

There is a lot of material here, much of it deliberately created with learners with a broad range of challenges in mind. There content is interesting and engaging, and it can be used as a launchpad for many creative hours in the classroom. The only potential downside is that you need to be a London Grid for Learning (or Trustnet) subscribing school to get access. But that is over 95% of schools in the capital. To find out if you are one go to www.sainfo.lgfl.net

Resources for teaching online safety to SEND pupils

Regardless of age, ability or learning needs, the essentials of online safety remain consistent: look after your personal information; be sure you know who real ‘friends’ are; don’t meet anyone offline you first met online; and tell an adult if something concerns you. However, the media we use to convey these messages needs to be varied in order to put them across to audiences with the whole range of special educational needs and disabilities (SEND).

In some instances this can be straightforward. For example, Thinkuknow have produced a couple of videos specifically for older pupils – teenagers – whose first language is British Sign Language (BSL). These are well made, with age appropriate content, and using deaf, adolescent, actors that the intended audience can relate to. In fact, although there is no spoken dialogue, the use of sub-titles means that videos such as Sam’s Real Friends could be used inclusively with wider school groups. But this is a very specific cohort, with a clear learning need – materials in their first language, BSL.

Other groups will need different approaches. The STAR Toolkit was developed with learners with autistic spectrum conditions (ASC) in mind, although they could be useful for learners with a wider range of needs. They address several different concerns including ‘Safe sharing,’ ‘Trust,’ ‘Action,’ and ‘Respect,’ (hence the name).  However, the materials provided, PowerPoints and worksheets, will need adapting for the audience as some of the slides are quite busy, with a lot of text and some demanding language.

Widgit have also produced resources intended for learners with a wide range of challenges who may have difficulty in decoding text with materials which use their symbol set to aid access to a number of straightforward online rules.

The Thinkuknow website also has some resources targeted at SEND learners, which can be searched for by age range in their resource library , although the results can be quite mixed. In the 4-7 age range the same videos are offered whether or not the SEND group is chosen. The content across all age groups can be quite demanding, although age appropriate for the audience, but requiring a level of understanding that those with cognitive challenges may find difficult to comprehend.  One suggestion might be to use materials for a younger age group with a simpler content level, but this raises issues of age appropriateness.

Other providers have also created materials that could, with the right level of support, be helpful, even for secondary students. Discovery Education’s video on Youtube has very direct messages using cartoon characters. Whilst these are intended for a primary audience the content is clear and the presentation is not patronising, nor talks down to its viewers. The characters whilst obviously children are not of a particular age group, so may be acceptable to older learners.

A similar way of offering content focused on young audiences offered in a way that older students might find engaging too, is to use the Disney Corporation’s Safety Smart with Timon and Pum ba video which can be found on Youtube here. The whole video is quite long for an SEND audience, and in the balance of entertainment to education tends to favour the former, so it may need to be watched several times, stopping and starting to pick up the teaching points. There is also a shorter version. Whilst the content might need unpacking, it can prove effective, as ever yone, regardless of age, loves the Lion King so won’t mind watching the antics of two of its stars.

With the range and complexity of SEND, and the added layer of online safety being a subject that needs to be revisited throughout a child or young person’s time in school, the task of finding appropriate materials to engage and educate can prove challenging. But if we want them to live and to learn independently, it is a task that benefits from  a bit of research.

Words and Pictures. oh…and Sounds & Videos!

Multimedia Authoring

Where once they just did writing, pupils in EYFS and KS1 can use all sorts of tools to express themselves and to publish work. Computers make it possible to publish work, quickly and easily, that combines text with images, sound and video.

For schools that subscribe to Purplemash, 2CreateAStory is very popular with its easy-to-use interface, recognisable tools and not too much text. Children make talking stories in minutes and publish them almost anywhere.

2Create a Story allows children to create their own multimedia digital storybooks. They can combine words, pictures, sounds and animation in a storybook format to publish literacy, science, history, RE and other work. This program allows them to animate their drawings, include pre-recorded or their own noises and sound files, and save their work, and share it by email, with a QR or embed code, on a display board or blog for parents and others to see.  These can also be printed out as a fold up storybook.

There are three modes of 2Create a Story: My Simple Story, My Story and My Adventure Story. My Simple Story has a simplified user interface with fewer drawing tools, fewer animations and sounds and no background button. This is to make creating books easier for younger children. My Story includes added features such as backgrounds and sound recording. My Adventure Story, probably more suited to KS2, includes the functionality to create non-sequential links between pages and animate characters

This icon displays the story planner view which shows how the story flows. In a Simple story or My Story this will be sequential. In an Adventure story it may not be. This assists children in planning their story. You can click on any page to go to that page. You can zoom in if you have a mouse with a zoom roller on it or if using a touch screen. When in play mode, the overview will still work to take you straight to a page of a story. This is very useful in Adventure stories when testing whether all the routes through a story work correctly as you do not have to go through the whole story each time. Great Fun!!

If you don’t have PurpleMash,  PowerPoint can also be used to combine text, photos, sounds and video files; and hyperlinks can be used to link between items and slides to make non-consecutive stories. This is particularly useful for doing a presentation at, for instance, an annual review. A photograph of the child achieving a target can be inserted with a sound file or text explaining what is happening. But also pupils can get their message across in almost every curriculum area, using sound, video and images as well as text boxes.

An iPad app called “Our Story” is free from the Open University and allows children to combine a photo or short video with text and sound files. This can be printed out but obviously, as with all these solutions, you lose the dynamic aspects of the work, the sound, video and animations. Another excellent tool for annual reviews.

Book Creator is another app that allows the pupils to combine text and drawing, sound and video and gives different shaped books or comic templates. This iPad app costs £4.99 at the time of writing (2019) and you can also buy the app for Chromebook and Windows. After choosing your template you can change the colour of the pages, the text and add videos, sound files, drawing and text to create your own stories. Books can be loaded on the internet and the URL sent to whoever wants or needs to see the finished product. Here’s one I made earlier 🙂


Puppet Edu is an iPad app that allows you to search online libraries for the images you need for your humanities or science work and then add text and sound files as well as a music sound track to your work.

Subscribe By Email

This form is protected by reCAPTCHA and the Google Privacy Policy and Terms of Service apply.

Skip to toolbar